Inovar Floor laminate flooring can be used and installed as a DIY product. Although we strongly recommend using a professional to make sure your subfloors and installation method are adequate to keep your warranty in order. Every box has the installation instructions on the back on the box. If you would like to view the instructions online please view instructions or download them as a pdf.
Installation Instructions – Inovar Floor
Read completely before starting installation
All installed boards will be considered as accepted by the installer and/or homeowner. Any defects should be reported to the retailer immediately for inspection and/or replacement. We cannot accept responsibility for flooring installed with visible defects.
General precautions
Inovar Floor products are inspected for quality before packaging and shipping. Nevertheless, a final jobsite inspection of your flooring should be performed for grade, colour, finish and quality. Ensure adequate lighting for proper inspection. Room temperature and humidity of the installation area should be consistent with normal, year-round living conditions for at least a week before installation. Room temperature of 15°-30°C and a humidity range of 30-70% is recommended. It is most important that you install the flooring immediately after you open the cartons, without waiting for several hours or days. Do not store directly on concrete or near outside walls.
General installation notes
ALL 8MM LAMINATE FLOORS REACT TO HUMIDITY AND MOISTURE. It is the responsibility of the installer and the owner to install an effective moisture barrier and to maintain correct moisture and humidity percentages.
- The humidity of a room can vary due to many factors – the change of seasons for example. The floor must be able to expand and contract in all directions.
- This 8mm Laminate flooring is of natural origin and may have slight variations in shade and grain. It should be installed from several cartons at the same time to ensure good
colour and shade mixture. - When possible, pre-select and set aside boards that blend best with all floor beadings, skirting boards or mounted mouldings used to assure a uniform final appearance. Install these boards adjoining the mouldings.
- Be attentive to staggering the ends of boards in adjacent rows. They should be staggered at no less than 300mm header to header joint.
- Any installation requiring the flooring to exceed 8 metres in width or 12 metres in length will require an expansion or T-moulding. All doorways and adjoining rooms should have expansion joints.
- Always allow a minimum 12-15mm expansion around all vertical obstructions.
Under floor heating
Under floor heating is not necessary with Inovar Floor laminates. However, if wanted, please obtain exact/detailed specifications from your approved flooring dealer.
Subfoor preparation
CONCRETE
Ensure that your subfloor is dry, clean, flat, smooth and level. Height differences of not more than 3mm in a metre must be levelled. The slab must also be no more than RH60% or below to be suitable for 8mm Laminate flooring. Correct any changes in height difference and ensure that the levelling compound has cured prior to starting your installation.
WOOD AND OTHER SURFACES
Ensure that your subfloor is dry, clean, flat, smooth and level. Height differences of not more than 3mm in a metre must be levelled. Correct any changes in height difference and ensure that the levelling compound has cured prior to starting your installation.
Preparing to install
1) Clean and sweep thoroughly. The vapour barrier must overlap and be taped closed over its entire length.
2) Let the opened packages of flooring lie flat on the floor in the room in which the floor is to be installed.
Boxes must be flat & slightly off the raw concrete +/- 25mm.
3) Check door and door frame clearances to ensure that doors will move freely without contacting the 8mm Laminate surface.
4) Although a Inovar Floor 8mm Laminate floor can be installed in any direction, as a rule, 8mm Laminate floors are usually installed perpendicular to a window. Installing the floor parallel to the longest wall tends to make a room appear larger. You will get better results by laying two or three rows of Inovar Floor 8mm Laminate in advance to get an eye pleasing distribution of the plank.
5) Lay INOVARLAY Underlay (or another approved underlay) taping the edges together using wide adhesive tape, but do not overlap the edges.
Installation
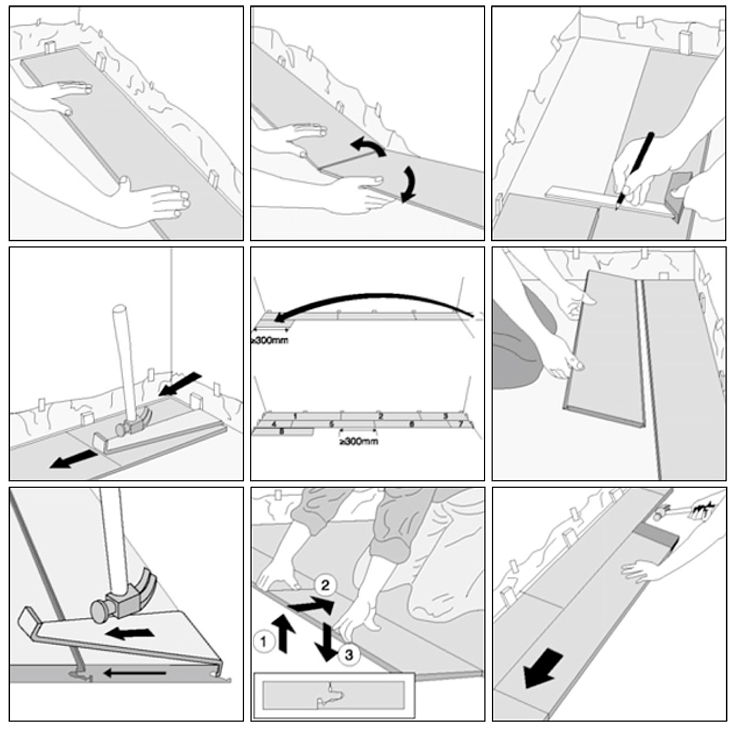
1) Measure the room carefully to determine if it is square, and to calculate the width of the last row. For planks less than 50mm in width, re-cutting the first row will be necessary to ensure stability (do not include the tongue of a plank in your measurements, as all exposed tongues must be removed from the perimeter of the floor – i.e. the first row of planks). Should you have an irregular wall for the first row, the plank must be cut to follow the wall’s irregularities.
2) When preparing to saw a plank (use safety glasses), always ensure that the decorative surface of the plank is facing down.
3) Starting in one corner of the room, the flooring should be installed from left to right, with the tongue sides facing the walls. Place spacers between the plank and the wall (spacers provide the necessary space required for expansion around the perimeter of the floor). It is especially important to leave at least 10mm free around the entire floor. To ensure stability, the planks at the end of each row must not be shorter than 300mm. If your last plank is shorter than 300mm, it is advised to re-cut the first plank in the row. The remainder of the plank from your first row can be used as the first plank of the next row. Stagger the joins by cutting the first plank of every row to different lengths IE300mm,600mm,900mm, full board. This will give a random pattern that will then be repeated until the opposite wall is reached.
4) When laying the planks for the first row, place the first plank flat and against the spacers. To put the second panel into place, join the width side of the second panel with the width side of the first panel, push them together firmly and fasten the joint by pushing the panel down flat onto the sub-floor. If the joining is not tight, use a hammer and a suitable tapping block and tap gently at the other end of the second panel, if necessary. Make sure the alignment of planks is straight.
5)Repeat this procedure and complete the first row. At the end of the first row, mark and cut the last panel to obtain the suitable size/shape to fit the remaining space. Cut the panel with the décor side facing up if using a fine-toothed handsaw, and with the décor facing downwards if using a jigsaw. This last piece can be fitted with the use of a suitable tensioning tool or heel iron.
6)To start the second row, use the leftover piece of the last panel from the first row. To install the first panel of the second row, have it slightly tilted with its tongue inserted into the groove of the panel in the first row, and then press it down flat firmly so that the tongue and groove will interlock. The joint should be locked tight. If not, dismantle the panel and repeat the process and simply tap the panels tight with a heel iron(or a suitable tapping block) and a hammer. Start tapping from one end to the other, along the length side. Position the width(end join) of the subsequent panel close to the exposed width(end join) of the first panel so the lock is almost in place, with its tongue on the length side inserted into the groove of the panel of first row. Standing on the panels of the first row, pull this panel inwards and then push it firmly downwards so that the tongue interlocks with groove of the panel in the first row.
Then use a hammer and tapping block and tap gently at the other end of the panel to tighten the width side. Follow the laying instructions explained earlier, and complete the second row. Subsequent panels / consecutive rows can be installed by repeating these steps.
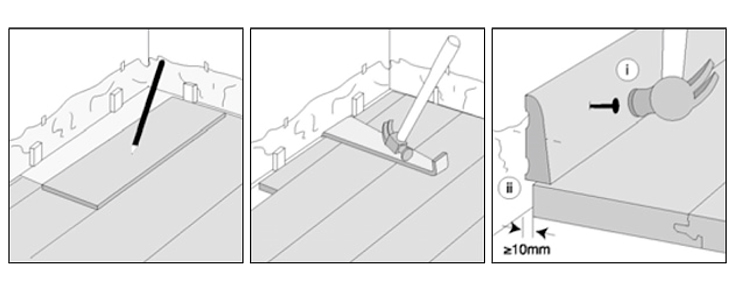
7)When you reach the final row, place a loose panel precisely on the last laid panel. Place another panel on top, but with its edge 10mm from the wall. Trace a cutting line along the middle panel and saw it along that line.
8) Lay the panel you cut and ease it into position. Insert spacers between the wall and the last panel laid to be sure there is a 10mm expansion gap.
9) When going from one room to the other, make sure to separate the rooms with a transition moulding. The floor is ready for use as soon as it is laid.


Finishing
1) Remove the spacers.
2) Cover the expansion joints around the perimeter of the floor with baseboard mouldings and/or quarter rounds. If a vapour barrier was used, do not forget to fold the polyethylene film along the edge of the walls under the baseboards and/or quarter rounds. Fit these products to the walls without attaching them to the floor. Make sure that a 0.15mm feeler gauge is able to slide freely underneath the skirting to ensure the floor is not trapped, thus preventing expansion or contraction.
3) Install the T-mouldings to hide the expansion gaps where needed (doorways, more than 8m wide or 12m long, etc.).
4) Any remaining boards can be kept for several years, stored flat in a moisture-free area. Furniture can be put back in position right away.
Maintenance
Sweep or vacuum as often as necessary to remove any loose dirt or grit.
Use protective mats at all exterior entrances. Do not use rubber-based mats as the rubber may leach into the 8mm Laminate.
Use felt protectors under heavy pieces of furniture.
Never slide or roll furniture or appliances across your floor. Protect the surface if using a trolley to move heavy objects.
Spiked heels or shoes in need of repair can severely damage your floor. In areas of excessive traffic and wear, make use of runners or area rugs.
Damp mop only – avoid excessive amounts of water. If a spill occurs, soak up the bulk of the liquid promptly.
Never use oil, soap, wax or other household products to clean your floor.
Keep animal nails trimmed.
Maintain relative humidity levels between 30% and 70%.

