Diamond Core SPC can be used and installed as a DIY product. Although we strongly recommend using a professional to make sure your subfloors and installation method are adequate to keep your warranty in order.Every box has the installation instructions on the back on the box. If you would like to view the instructions online please view instructions or download them as a pdf.
Installation Instructions – Diamond Core SPC
PRE-INSTALLATION SUBFLOOR REQUIREMENTS
All Subfloors must be:
•Dry
•Clean: Thoroughly swept and free of all debris
•Structurally sound
•Level: Flat to 4.7mm per 3.3 meters radius
Wood sub-floors must be dry and well secured. Nail or screw every 15cm along joists to avoid squeaking. If not level, sand down high spots and fill low spots with a leveling patch. Make sure all crawl space are open & has proper ventilation.Concrete subfloors must be fully cured, at least 60 days old, and should have a painted or 200 micron polyethylene vapour barrier between concrete and ground. Subfloor should be flat and level within 4.7mm per 3.3 meters. If necessary grind high spots down and level low spots with a leveling compound. Ceramic Tile, resilient tile and sheet vinyl must be well bonded to subfloor, in good condition, clean and level. Do not sand existing vinyl floors, as they may contain asbestos.
INSTALLATION TOOLSstrong
•Tape measure
•Tapping block (trimmed piece of flooring)
•Pencil
•Heel iron / pry bar / pull bar
•Chalk line
•Crosscut power saw / Guillotine
•3M Scotch-Blue™ 2080 Tape
•Rubber mallet
STARTING YOUR INSTALLATION
Work from several open boxes of flooring and “dry lay” the floor before permanently laying the floor. This will allow you to select the varying grains ∓ colors and to arrange them in a harmonious pattern. Remember, it is the installers’ responsibility to determine the expectations of what the finished floor will look like with the end user first and then to cull out pieces that do not meet those expectations.
Begin installation next to an outside wall. This is usually the straightest and best reference for establishing a straight working line. Establish this line by measuring an equal distance from the wall at both ends and snapping a chalk line. The distance you measure from the wall should be the width of a plank. You may need to scribe cut the first row of planks to match the wall in order to make a straight working line if the wall is not square.
You may want to position a few rows before starting installation to confirm your layout decision and working line. When laying flooring, stagger end joints from row to row by at least 30cm/300mm.When cutting the last plank in a row to fit, you can use the cut-off end to begin the next row. If cut-off end is less than 30cm/300mm in length, discard it and instead cut a new plank at a random length and use it to start the next row. Always begin each row from the same side of the room. When near a wall, you can use a pry bar to pry close the side and end joints.
KEY INSTALLATION METHODS
*
Subfloor Flatness Tolerances
Vapor Barrier recommended
Is underlayment (pad) required
Acclimation Requirements
Transition Requirements (T-Mold) for Large Spaces
Transition Requirements (T-Mold) Doorways/Thresholds
Installation over existing ceramic tile floor
Glue Down Installation
Subfloor RH/MVER (Moisture vapour
emission rate) recommendations
Radiant Heat
Perimeter Expansion requirements
Optimal Interior Environmental Conditions
Fitted Cabinets
Extreme temperature
Definition of “Waterproof”
RESIDENTIAL and COMMERCIAL APPPLICATIONS
Flat to 4.7mm per 3.3meter radius
Painted or 200 micron
No – IXPE underlay pad attached
24 Hours recommended
Required when in excess of recommended floor coverage.
N.B. Recommended coverage in an uncontrolled environment is 20lin.m x 15lin.m
Required if outside of recommended floor coverage 20 lin.m x 15 lin.m
Filling in grout lines wider than 5mm/deeper than 5mm is required
Not recommended/Except for staircases.
85% RH/8 lbs MVER (Moisture vapour emission rate)
Not to exceed 28° C
Expansion gap must be 10mm within the total floor coverage.Expansion gap to be covered with a 1⁄4 round or skirting on perimeter walls & around heavy fixed objects
18°– 30°C 60% – 80% RH
Do not install cabinets on floor planks/panels
Should be maintained between 3°C and 50°C
Structural integrity of flooring will not degrade due to contact with moisture/water
Inspection: Prior to installation, inspect planks in daylight for visible faults/damage. Check if subfloor/site conditions comply with the specifications described in these instructions. If you are not satisfied do not install, and contact your supplier.
Before laying: Measure the room at right angle to the direction of the planks. For best visual effect, planks in the final row should be at least 50mm wide (minimum), or half width of plank. For this purpose, planks in the first row can be cut to smaller size. Shuffle planks in order to obtain a pleasant blend of shades. Lay planks preferably following the
direction of the main source of light. We recommend laying on wooden floors crossways (ensure there is sufficient cross ventilation running under the existing wooden floor) to the existing floorboard. Planks must not be nailed or screwed to the subfloor. Baseboards and molding must not be fixed in a way which restricts the movement of the floor.
INSTALLING THE FIRST ROW:
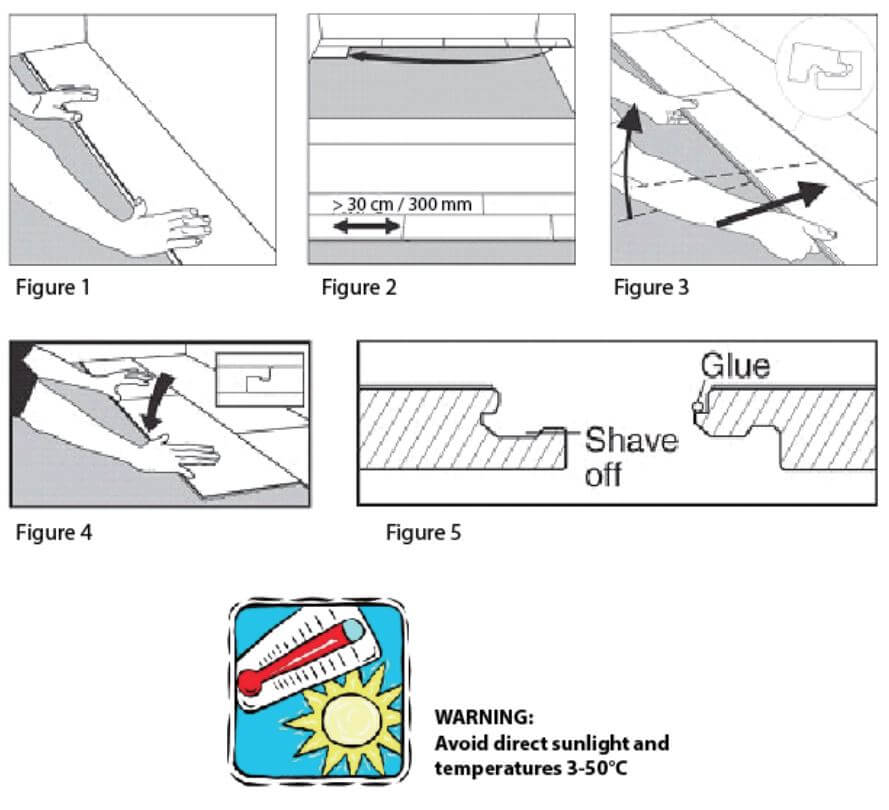
- Starting from the left with the tongue facing the wall, carefully place the first board in place. (Figure1)
- Place 10mm spacers between the short and long side of the planks and the wall.
- Always position one spacer between the wall and where the planks join.
- The end joints of the planks in the first row are assembled by inserting the tongue side into the groove side of the previous plank at a low angle. Gradually lower the plank down flat until the end joint closes, insuring that the planks are perfectly aligned. Install the remaining full planks in the first row.
- Cut the final board piece to length, never less than 30cm/300mm. (figure 2)
- The remaining piece cut off from the last plank in the first row may serve as the first plank in the second row
provided it is at least 30cm/300mm long. Always stagger the end joints from row to row to a minimum of
30cm/300mm
CONTINUING THE INSTALLATION:
1. Begin the second row with the cut piece from the first row. (figure 3) If the cut piece is shorter than
30cm/300mm, do not use it. Instead, begin with a new board that is at least 30cm/300mm in length and
allows 30cm/300mm between the end joints on the adjacent planks.
2. Position the long side of the first board in place overlapping the groove of the planks in the previous row by approximately 3mm. Then angle the end joint into the previous plank. Angle the plank up and gently push forward until the plank locks into the previous row.(figure 2) Slide the board to the left/right as necessary to align the edges of the end joint.
3. Carefully push the board down until the tongue & groove lock together on the side and ends.
4. It is important to make sure that the first three rows are straight and square as they can affect the entire installation.
5. Install the remaining boards and rows in the same manner. (figure 3 and 4)
6. Cut the last board to size. If necessary, complete the tight fit by tapping the board into place with a pull bar.
7. Whenever practical, use cut pieces from previous rows as the starter board to reduce waste. (figure 2)
8. Maintain 30cm/300mm spacing between end joints after the first four rows for best appearance. (figure 2)

FINISHING THE INSTALLATION:
- After all the planks have been installed, remove all the spacers from the perimeter of the room.
- Install transition/reducer/end moldings. Do not fasten any floor finishing moldings through/to/on the floor.
- Predrill and install quarter round or skirting. Moldings must be sufficient to cover the 10mm expansion gap.
Always fasten these to the wall and not the floor planks.


